Our friend David Blume made his own hacked Ultegra Di2 TT shifters. Here’s his account of the build:
I’ll date myself and admit that my parents bought me a Commodore 64 computer. It was a novelty and, although I desperately wanted this latest technology gadget, I really had no idea what do with it, and never did. The thought that I would use it to ‘hack’ is as far-fetched as me going on from this humble beginning to become any one of a great number of computer geniuses…Gates, Jobs, Norton…and so on. My early days of hacking involved removing the small hard plastic wheels from my Tonka Toy Tow Truck to use on a makeshift engine-less go-cart. That engineering wonder had the speed of a Central Park orse buggy and steered about as well as my sister’s Camaro on the icy Vermont roads we took on a ski weekend to Killington years later.
The years have marched on, but the idea of building something that you can’t buy anywhere and actually use for fun still intrigues, if not consumes me at times. The Internet is a dangerous place if you have this vulnerability. Crazy cool ideas lurk everywhere on-line, with endless DIY ideas that would punch your ticket to “Jackass” in a nanosecond. Fortunately, I suffer from both acro- and claustrophobia, so a Steve Fossett or Jules Verne type of insanity is beyond my consideration. Of course, you can still do plenty of land-based damage.
This past Spring on another ill-advised on-line excursion to the “Slowtwitch” endurance athlete forums I was overcome like a mad geneticist by two irresistible temptations that just seemed like they were meant to mate – think Andre Agassi and Steffi Graff, Davis Phinney and Connie Carpenter, or Tim Burton and Helena Bonham Carter.
In plain sight, two separate Forum threads destined for each other: 1) some genius wanted to drill a hole in the steerer tube of his Scott Plasma 3 TT frame to convert it to an all-internal routing Di2 bike; and (2) another joker had popped the shifting modules out of his brand new Ultegra brake/shifter levers and wired up his own switches to make a TT compatible Ultegra shifter (as there is not yet an off-the-shelf TT Ultegra shifter available from Shimano). I had been strong and not succumbed to foolish temptation for so long time, but now I couldn’t resist…a NEW PROJECT! I had to build my very own Frankenstein (pronounced “Fronken-schtayn”) TT bike.
I was already on the hunt for a Scott Plasma TT frame to replace my aging, finicky and poor fitting 2008 Felt DA, when I spied an late night eBay blue light special – a brand new leftover 2011 Scott Plasma 3 frame in my size (56/L) – “Buy it Now” option exercised. Despite having run Campy since the 8 speed days (1994) and my love affair with Record 11, the appeal of electronic shifting on a TT bike was just too alluring. My Felt had old Campy ratchet shifters and a really poorly shifting 10 speed group. The final straw was a chain that offered the stability of Nick Nolte on a chemical binge. It was time, plus I had sold a ton of cycling detritus on eBay through Piermont Bike and had enough credit to get an Ultegra Di2 Upgrade with no cash out of pocket.
Ultegra Di2 is newer than Dura Ace and many think that its superior. It is a bit heavier and the motors are off-the-shelf so they are a bit larger. The major difference is that DA is open source and Ultegra uses Canbus control. This means that ‘hacking’ Ultegra requires that you use the shifter modules and the battery mount which have the Canbus protocol programmed. Fortunately, the Ultegra wires are narrower gauge, so they’re easier to run.
I received the frame in early June and the Ultegra components shortly thereafter. While Scott makes a Di2 specific TT frame, its not available in the US, so the added complexity of this project would involve custom cable routing and wiring. The frameset clearly comes from the same production line as the Di2 versions, so there are little helpful guides about where to drill out carbon bits and run wires.
The first step was to remove the electronic shifting modules from the levers. This proved quite easy. Next, I soldered extension wires on to the module wires to connect my momentary switches to be mounted in the aerobar extensions. My plan was to insert the shifter modules inside the frame downtube near the BB wrapped inside foam padding and run the shifter wires up the downtube, through the steerer tube and into the extensions. Here is the first photo of my crazy plan:
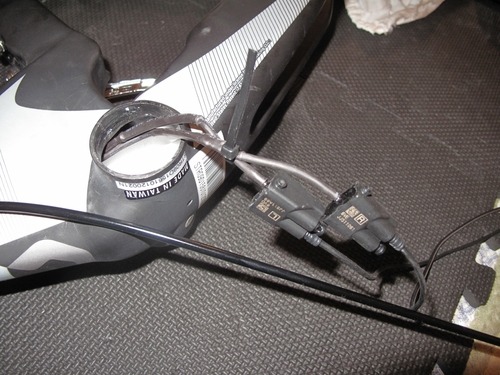
Each module has three wires (one each for up and down shifting, and a common (ground)). I used heat shrink wrap to seal the 3 wires for each module together and to protect them inside the frame. Importantly, this also provided added protection against the potential friction around the tight junctions resulting from snaking them through the steerer tube. Fishing the wires up the downtube was fairly straightforward. Running them through the steerer and being able to get the stem mounted was another war altogether. This took many hours of trial and error, including several iterations of expanding the holes in the steerer to make enough room to run both sets of shifter wires and the rear brake cable, along with space to insert the steerer preload column which runs perpendicular inside the steerer tube. This was the most challenging part of the project, by far.
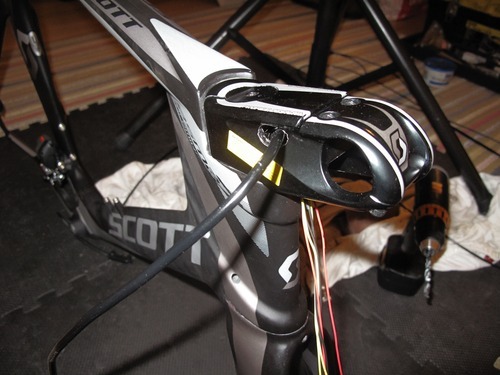
Success! Finally…
Here is another view:
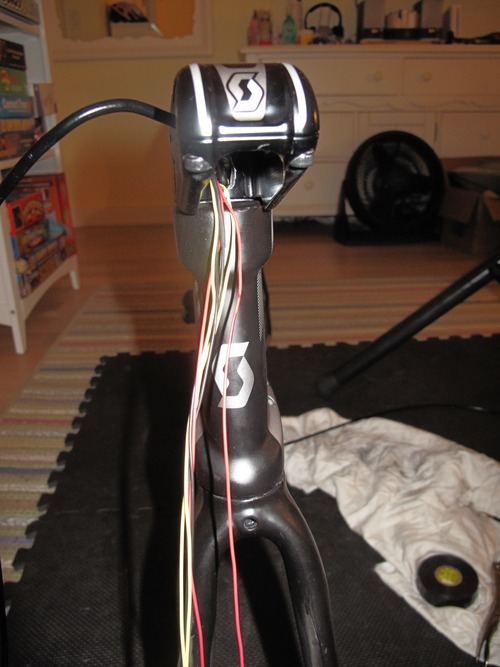
Black, Red and Yellow wires….there’s Belgian blood in those veins!
I got really lucky and scored a shorter 70mm stem on Slowtwitch that another Scott owner had drilled out to allow for running the cables through the sides. He decided to go with a flat stem, and was kind enough to sell me his now unneeded stem. More serendipity was to come…
Following the lead of Locutus and others on Slowtwitch, I was planning on using four momentary switches in the aerobar extensions. It proved challenging to find weatherproof/resistant switches that were both attractive and user friendly. I also much preferred the idea of a two-direction rocker switch over individual switches. Finding a sealed, weather-resistant two-direction momentary rocker switch wasn’t easy, but then on a Digikey search lightning struck:
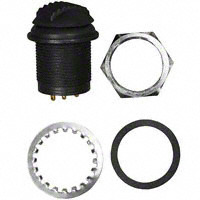
Rocker switch of my dreams…sad commentary on my dreams.
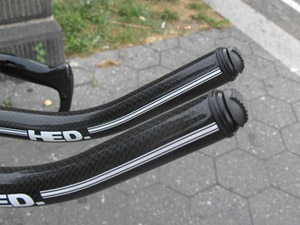
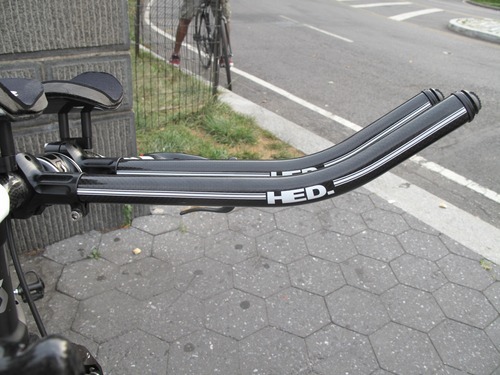
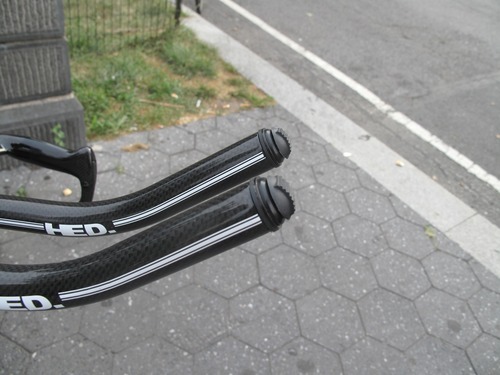
Here are some views of the extensions with the switches mounted and wired – ready to connect to the module wires:
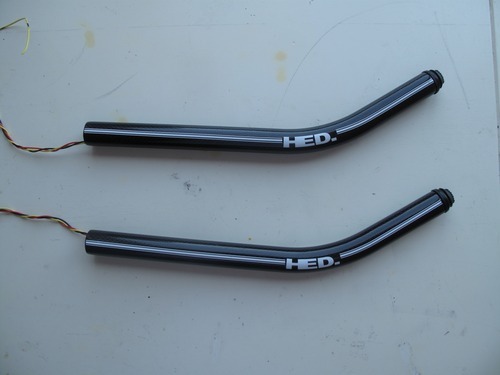
HED Ski bends
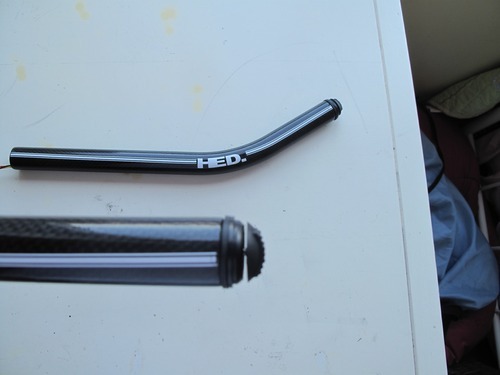
Close up of the rocker switch – looks delicate, but don’t be fooled, these are nice quality. I originally mounted (as shown here) with the included rubber washer, but the fit was even better without out. I used a small amount of silicone to seal the switch to the extension. This is overkill anyway since the switch is rated to work underwater, all connections are soldered and sealed with heat shrink tubing and I rarely ride my TT bike in the rain. They work very nicely. Push to go to harder gear and pull for an easier one – simple enough for even me to remember it.
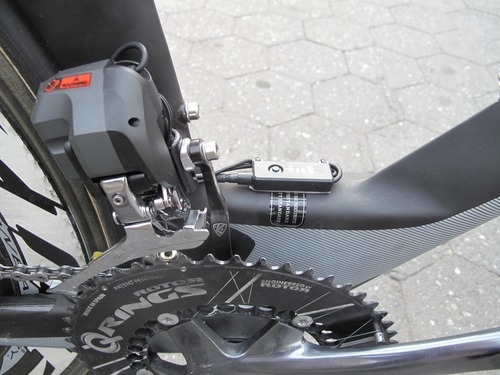
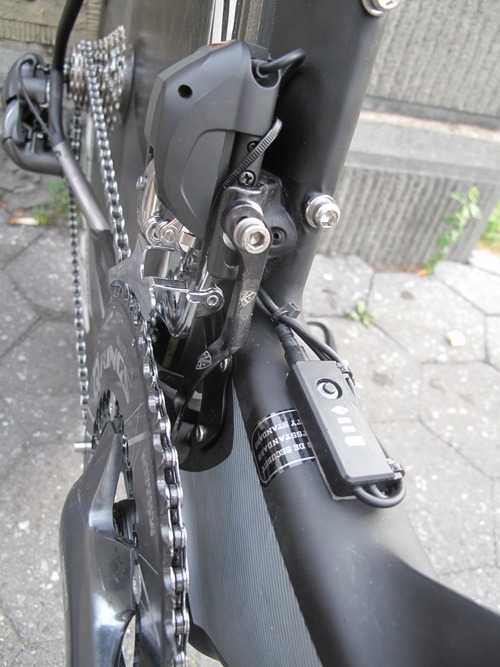
The Scott frame has a BB access opening covered by a metal plate to help facilitate running the front derailleur cable. I drilled out the plate’s cable access hole and also ran the control box wires through this opening, mounting the box on top of the BB. The Profile stem did not allow for clean mounting and I never loved the look of the dangling control box near the bars. Since the modules were close to the BB, this seemed like a logical way to go. In fact, the battery mount, battery, and junction box all fit around the BB with foam padding. I could have completed the entire project with no single Di2 cable longer than 250mm.
I purchased a lithium ion battery to mount internally, which I soldered directly to the battery mount. You need to use the mount since it contains the Canbus protocol. You don’t need (or want the Shimano Battery however). The Shimano battery goes for upwards of $80. I am running this setup on a $15 Tenergy battery:
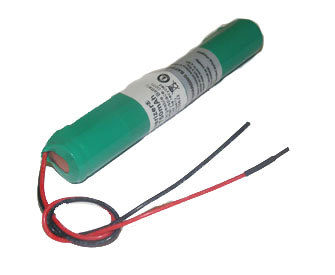
This baby now lives in my seattube (near the BB). I attached a series of plastic ties to easily lift it out. I soldered a female pin jack onto the wires shown above, which connects to the battery mount to which I soldered the male jack. To charge the battery, I remove the BB cover plate and plug the jack into the charger. Most builds I have seen have battery access through the seatpost. With the Scott, the BB plate is so handy, I prefer this access.
One of the amazing things about this build is that if you are simply upgrading from an existing Shimano or SRAM setup, you can do it for about $1,000. All you need are the shifters, front and rear derailleur, switches, Shimano battery mount, control box, aftermarket battery and a few Di2 cables. You don’t even need the junction box (you can solder all the connections together (for convenience I used it anyway). You may need to budget some additional costs for soldering iron, solder, wire, shrink wrap, silicone and a few specialty tools (the $10 voltmeter proved really handy).
Since I was running Campy on my finicky Felt, I also had to swap out the freehubs on my TT wheels. I use an old Powertap Zipp wheel with an aerojacket cover for training and TTs where I want power or I am too lazy to go with the full disc. I also have a disc (another eBay special). With that complete, the remaining work was a more traditional bike build.
Some 60 hours later…and she’s ready to rock:
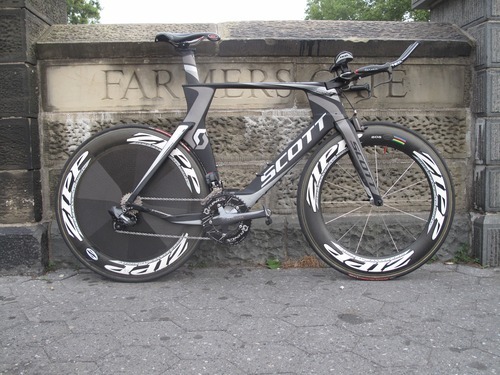
Before the maiden voyage, fortunately no icebergs in the Park…only pedestrians.
Here are some more images:
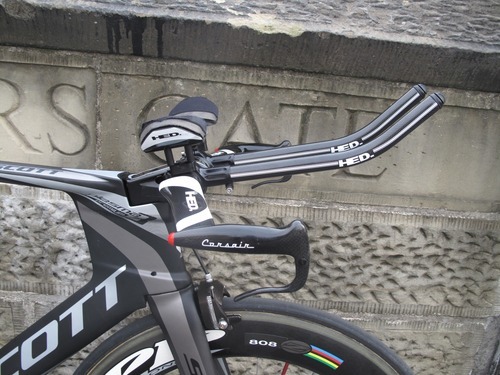
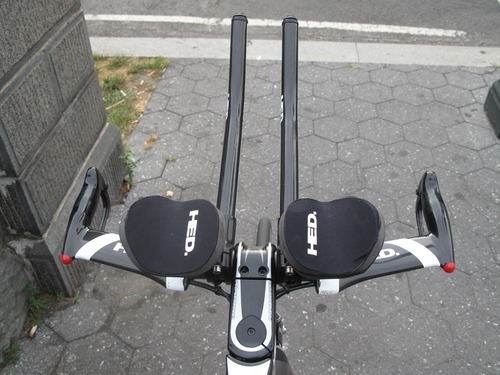
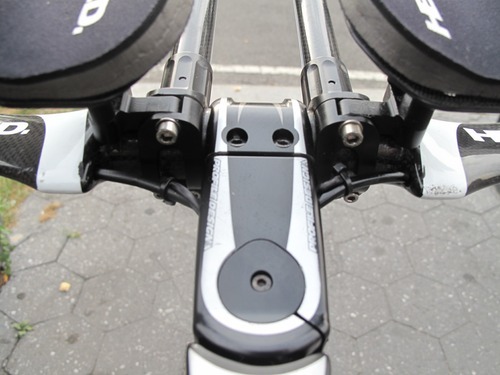
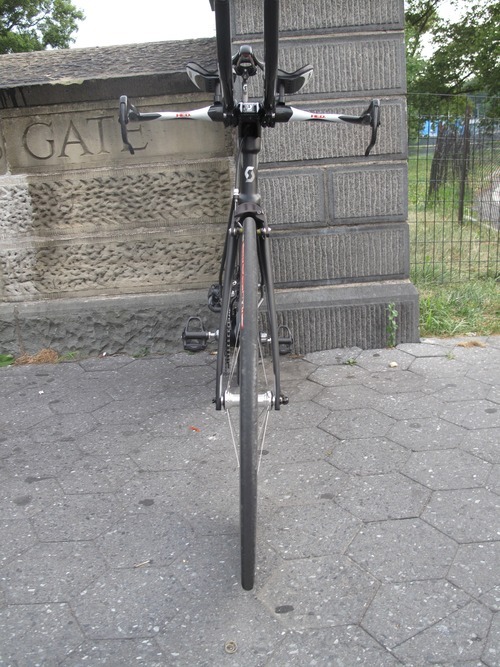
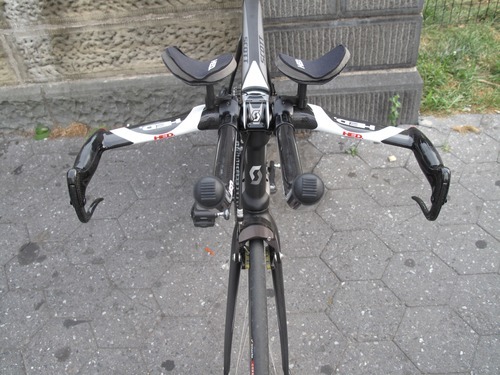
One of the advantages of Di2 is the ability to have shifters on the extensions and the horns. This current setup doesn’t have the horn shifters. I purchased Cateye surface mount switches and was able to run the wires through the base bar, but i prefer the cleaner look of this setup for now. I also think that for shorter TT efforts and training (which are my focus and primary use for the TT bike) that having shifters on the horns has only a marginal benefit. If I decide to add them, I’ll likely make that a winter project. This machine looks great, but is wildly underpowered, and that has to be the primary upgrade focus for now.
When hacks go wrong, the outcome can be ugly. I put those wheels back on the Tonka truck, finally admitting that they really were not up to the task I had in mind when I attached them to the cart with nails as axles. The truck never did roll the same. I’m happy to say, that I have no plans to try and put those Ultegra shifter modules back in the levers – this hack is on point.

This sounds really hard!
DC
Looks good, nice to see improvements on it. Its only a matter time as if you can afford a Di system you probably want some custom setup anyway, not the canned setup.
I would want to see more shifter buttons to be added next or an integrated Leap Motion
shifter!
I really want to do this but where did you find the shifters?! Please help!
You can find more info at
http://forum.slowtwitch.com/gforum.cgi?post=4024982;
Hi there! I could have sworn I’ve visited your blog before
but after going through a few of the articles I realized it’s new to me.
Anyhow, I’m certainly pleased I discovered it and I’ll be
bookmarking it and checking back often!
Look into my web page … food & dining trends
http://www.bustedcarbon.com/
I will right away take hold of your rss as I can’t to
find youur email subscription hyperlink or nswsletter service.
Do you’ve any? Please allw me rrealize so that I may
just subscribe. Thanks.
My page watches online shopping
what size/guage wires are the Etube wires? thinking of hacking up a shifter and need to splice in some wiring
David,
thanks a lot for the quick reply! Shimano has a new battery which has a 17mm diameter and is 160mm long (http://www.bike24.com/p234979.html). I could purchase this battery at the same price as an aftermarket battery + the Shimano battery holder I need to attach it to the Canbus.
I assume that this battery should fit into the seattube. I just wasn’t sure whether the seattube is completely hollow or if there is a closed area on which the seatpost sits.
Thanks and best regards,
Frank
Hi David,
that is in fact a great hack! I am about to purchase a Scott Plasma TT frame which would save me drilling into a new frame. However, I would like to ask you a question regarding the internal battery: Did you put the battery into the seattube from the top or through the bottom bracket? Would it be possible to use the Shimano internal battery SM-BTR2 with this frame?
Thanks, best regards, Frank
Frank
Thanks for the compliment. I have been riding this bike for over a year now and it is a dream. For the battery, you will not be able to mount the Shimano battery inside the frame easily – its just too big and bulky. Not to mention wildly overpriced. I recommend an aftermarket battery – you can find them on-line at a specialty/hobby site. These are also the same batteries used in model helicopters and cars. See the Tenergy battery described in my write-up above. It cost about $25-$20 (vs $80 for the Shimano). The battery I used has a cylinder shape and fits easily into the seattube. I attached some wire ties to it to make it easy to remove, however, I also made the charging cable easily accessible so I don’t even have to remove the battery to charge it. I can access it through the accessory plate behind the crank. So far I have had to charge the battery only about 2x / yr (which is amazing).
Good luck with your custom install. You can find more info on Slowtwitch.com under “Ultegra Di2 Hack”
Puis-je Ïrendre certaines parzgrapheÑ• sur un blog personnel
?
My site – sexe hard gratuit
David, your build is amazing. I am trying to attempt the internal wiring without Di2, it that possible? If so advise. If not, I’ll have to get Di2.
Chuck
I am not sure that I understand your question. In order to run this setup using Ultegra components you will need to use the canbus controllers in the shifters.These are the rectangular “boxes” shown in the pic above with the wires going into the BB shell. For Dura Ace I don’t think you need the canbus boxes, but I am not sure. I went with Ultegra because at the time Ultegra TT shifters were not yet available and is about half the price of DA.
The way that I should have phrased it was is it possible with a mechanical system?
Are the Graveyard FBF race really cancelled? Why are people preregged?
Today, I went to the beach with my kids. I found a sea shell and gave it too my
4 year old daughter andd said “You can hear the ocean if you put this to your ear.” She placed the shell to her
ear and screamed. Thedre was a hermit crab inxide and
it pinched heer ear. She never wants to go back! LoL I know this
is completely off topic but I had to tell someone!
my web page :: forex robot trader review (http://www.barsanti.com.br)
Here is the battery:
https://www.batteryspace.com/Customized-Li-ion-14500-Battery-7.4-V-750mah-5.55wh-with-wire.aspx
Hello you guys done a great job by publishing this article, so keep it up.
Chuck
I would not attempt this with mechanical shifters. The cables would have to be twisted in a way that would likely impair shifting, if it worked at all.
DB
What a material of un-ambiguity and preserveness of valuable
know-how abot unpredicted emotions.
Look at my blog; buy used computers usa
Hi David would you be able to give a little info on the battery specs needed and site you purchased it from. I would like to just add an internal battery to a 7970 DI2 group set.
Thanks GG
When you take a picture of your bike for the internet, always shift into the big ring for the driveside shot.
Always.
Hi
Is this understood correctly?
All you need is
Rear derraliur
Front derraliur
Shifters
cables
Battery mount?
The “computer” is inside the shifters and battery mount?
The junction box is ONLY to gather the cables, and the cables could simply be soldered together ?
A better battery for it is important.So choose a professional battery shop.
http://www.kingwellbattery.com/products/24v-electric-bicycle-battery.htm
I have done the internal loom, but cannot see any polarity markings on the external battery mount that will end up in my downtube with a custom battery pack. Is the pin near the square end the positive or negative? I do not have access to a battery pack to test with a multimeter.
Hi, i read your blog from time to time and i own a similar one and i was just curious if you get a lot of spam feedback?
If so how do you resduce it, any plugin or anything you caan advise?
I get so much lately it’s driving mme insane so any assistance is very much
appreciated.
my wweb site 12bet
Cheers! A lot of forum posts!
xunjie ãƒÂ·ã‚¸ã‚¦ã‚©ãƒ³VSガオフルディオールã€
å˜ã«ã‚·ãƒ§ãƒ¼ã®æ‘‚å–é…力ã®ä»Šå£ã®ã‚¦ã‚§ãƒƒã‚¸ãƒ’ールã«æŠµæŠ—ã™ã‚‹ã“ã¨ã¯ã§ãã¾ã›ã‚“ã®ã§ã€
今日ã®å½“然ã®æ‚ªé”ã®ãƒ•ã‚¡ãƒƒã‚·ãƒ§ãƒ³å††ã¯ãƒ—ラダをç€ãŸã€‚